Developing Locally
Learn how to set up your development environment, get the code, and verify that it’s working.
This page will walk you through setting up the main CanJS repository on your computer. Remember that CanJS is split into multiple repositories, but you can apply the same general steps to set up any of the other repos.
We’ll cover the following details in this guide:
- Setting up your development environment.
- Getting the repository’s code and verify it’s working.
The following video walks through most of the following steps:
Setting up your development environment
Developing CanJS requires:
- A GitHub account and git client.
- Node.js version 5 or later.
- Firefox for running automated tests.
Sign up for GitHub and set up Git
If you don’t already have a GitHub account, you’ll need to create a new one.
There are a variety of ways to get a git command line client connected to your GitHub account. GitHub has great documentation on how to set up Git.
If you already have git installed, make sure you’ve
set up your ssh keys.
Install Node.js
Download Node.js version 5 or later at NodeJS.org. You can verify Node’s version with:
node -v
Install Firefox
Firefox is used to run the repository’s tests.
If you don’t already have it, download Firefox. Mozilla has guides for installing it on Linux, Mac, and Windows. Make sure it gets installed into the default location for your operating system.
Getting the code and verifying that it’s working
Once your environment is set up, you should be able to clone the repository you want to change, install its dependencies, and verify you’ve set up your development environment correctly.
Forking and cloning the repository
A “fork” is a copy of a repository in your personal GitHub account. “Cloning” is the process of getting the repository’s source code on your computer.
GitHub has a forking guide and a cloning guide that explains how to clone a repo on Linux, Mac, or Windows.
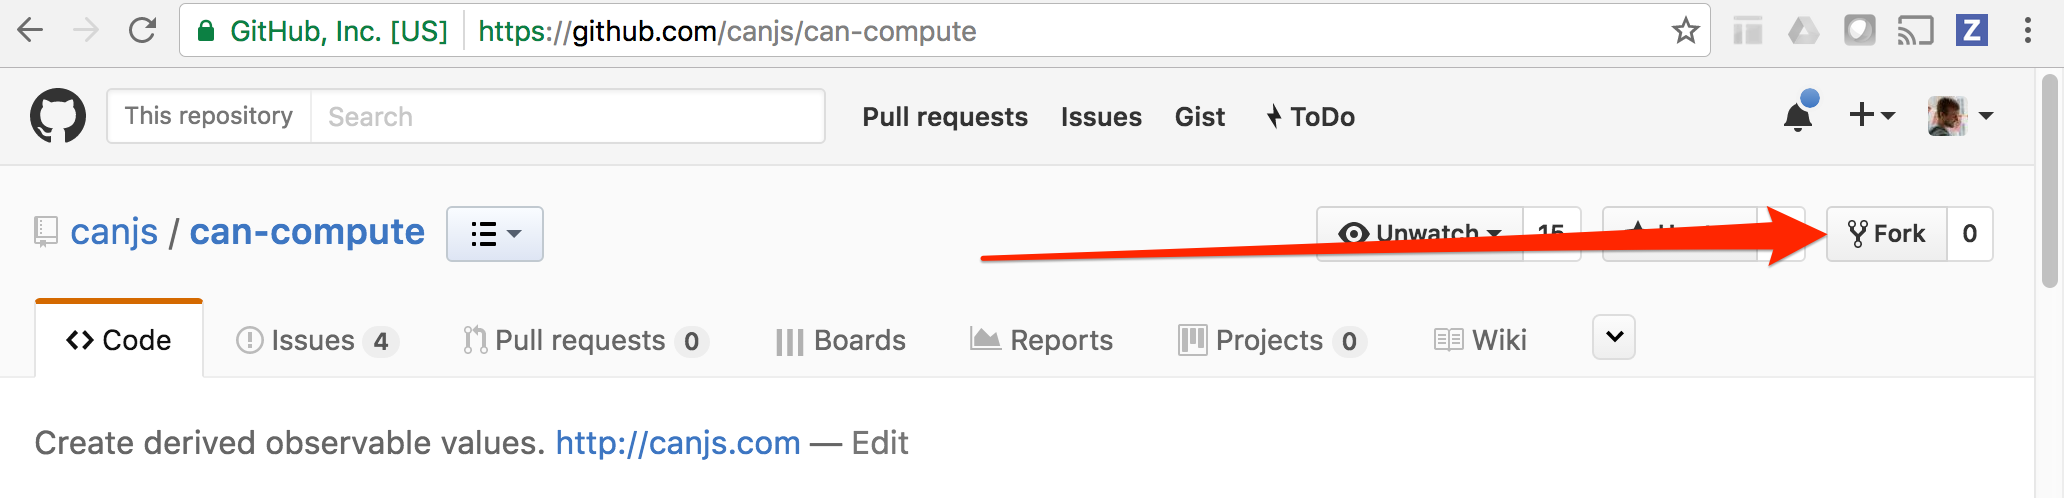
To start, click the Fork button to fork the repository from which you will be working. For example, you can fork can-compute by pressing its Fork button on GitHub:
Next, you’ll want to clone your forked version of the repository. GitHub’s guide will instruct you to clone it with a command like:
git clone git@github.com:<your username>/<repository-name>.git
For example, if your username is justinbmeyer and you forked can-compute:
git clone git@github.com:justinbmeyer/can-compute.git
Before continuing, move into your project’s directory. For example:
cd can-compute
Installing the dependencies
Now install the project’s dependencies with npm:
npm install
Running the tests
Make sure Firefox is closed and run the test suite with:
npm test
Note: When adding tests, make sure you check out can-test-helpers as it provides some useful helpers for some tests.
If every test passed, congrats! You have everything you need to change code and have the core team review it.
Building the documentation
The main CanJS repo contains CanJS.com.
To build the site, run:
npm run document
This should produce a static site in your canjs folder.
npm run will look for the document
script in the repository’s package.json
and run it.
Viewing the site
After you build the site, your canjs repository will now also contain the website.
To view the site, we recommend you install http-server.
npm install http-server -g
After it’s installed, you can start a server in the current directory:
http-server
http-server will tell you where you can go in your browser to see the site. It will be something like http://127.0.0.1:8080.
Making your changes
Next, learn about making changes and submitting a pull request.